Friday, 22 February 2013

Hand Drawings for Double Page Spread

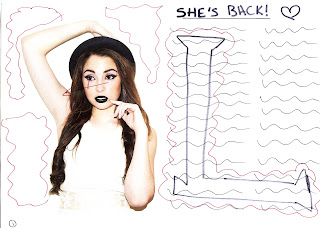
This is the first drawing I made for my double page spread. There are a number of problems with this drawing including all of the empty space, the way the eyes are looking, which leads off the page, and my research shows a large letter behind the text, but I want mine to be different so it needs to be changed.

I made some improvements on this drawing by adding in a heart next to the ‘L’ as the model’s name is ‘Lily Love’, and I added a quote to fill in the empty space, however, I still have a problem with the eyes looking the wrong way and there is still some empty space. In addition, I do not like having the title of the page saying ‘She’s Back’ as that is what I had on the cover and the contents page and so I need to refer back to my research. Lastly, I do not like have the writing in only 2 permeate columns as it looks too spacey.

 
The first improvement I made with this drawing is making the picture of the model on the other side of the page to make it so the model is facing the writing instead of away. I then added three columns instead of two as that is what my research shows and it looks more professional. In addition, I changed the title to ‘lily LOVE’ as that is what my research shows, however, it seems to look more like a poster so I need to add a boarder round the edge and I need to add page numbers at the bottom.


This is the final drawing for my double page spread and this is how I would like it to look. I am happy with this as it solves all of the problems from before as I filled in the spaces, changed the title, added my own image in the back and added three columns. There only thing I need to ensure I do in the process of making my product is the make it so all of the spacing is equal.
Thursday, 21 February 2013

Photograph for Double Page Spread

 
The first thing I did to change my photograph was to crop it into the right shape for my magazine cover.


I then changed the levels of my photograph to make it seem brighter.


I then changed the hue and saturation to make the photograph look the way I want it to. I continued this until my photograph eventually looked like this…


I then still thought that the picture did not seem right and thought the background looked too yellow so I used the lasso tool to select the background and changed the levels of it to look like this….


I then still thought that the picture did not seem right and thought the background looked too yellow so I used the lasso tool to select the background and changed the levels of it to look like this….


I then zoomed in closely and realised that there were some black marks on her face to change this, I had to use the clone tool at the side to remove it evenly.


I then realised the lipstick on my model seemed to have been done quite poorly so again I used the cloned tool to colour in the whole lips.

 
I then realised that the teeth of my model seemed to be quite dark with a hint of blue in it.

 
 I then used the Lasso Tool to select the area I want.


I eventually changed the teeth by making them brighter so they did not seem grey. I did this by playing with the levels to make them look better.


I then noticed that my model seemed to look like she had a bit of arm hair so I decided to use the clone tool to remove some for it to eventually look smooth and also adds some more light to the arm.


Final Double Page Spread Picture


Tuesday, 19 February 2013

General Double Page Spread Research


In some ways I feel that this is a good double page spread for a music magazine as it has a clear picture of who the artist is which automatically shows the reader what the piece of writing is about without them having to read and then find out. Also the title is big and clear which intrigues the reader of who it is about and has ’50 CENT’ written in a different colour so is draws the attention straight to it so the reader can confirm that the picture of the artist is who they think it is. In addition, they have used big letters for the first letter of the paragraph, which adds a creative aspect to the magazine and makes it seem more interesting.
However, I feel that the colour of the background behind the artist should be white like the rest of the page because you can easily see that the picture takes up over half the page. Also this double page spread looks a bit like a poster so to improve they could of added a boarder round it.
 

                Out of the three, this double page spread is my favourite as it has a clear picture of the artist on one side and plenty of writing on the other side. The large ‘J’ in the middle of the page relates to the artist which gives an artistic look and that side of the page will not look boring. The title at the top is clear. There is a good colour scheme as there are not too many colours and so it does not look overcrowded. ‘RapRadar’ shows the reader that Jay-Z is a rapper. All of this shows briefly what the article is about without having to read it fully.­­­­
                However, I feel that the big ‘J’ in the middle of the page should be a lighter colour and not red because it makes it harder to read as the ‘J’ stands out too much. I also feel that there is too much writing as there is a whole page worth as well as the writing on the picture.


                Personally, I feel that this double page spread is better than the previous one as it seems to look better and so the audience are more likely to read this one. This is because the layout seems to be more artistic and interesting with the ‘USA’ written at the back in large letters, which shows the reader what the piece of writing is about without having to read it. Also Florence Welch is the main picture with her sitting on what looks like part of the American flag and therefore gave the reader a better idea that the writing is about Florence going to America or that she has something to do with America. In addition, the writing ‘Florence Welch’ is in a different colour which is nowhere else on the page and so it automatically draws the attention to those words.
                However, the way the writing has been made looks confusing as the writing again looks too blocked and therefore it looks uneven and messy. Also, as well as the double page spread previously, is looks more like a poster as there is no boarder around the pages.

Detailed Double Page Spread Research


Specific Double Page Spread Research


These double pages spreads is how I want to lay out my own double page spread. I am planning to do this with having a large picture of my model on one side of the page, writing on the other and the have a large letter in the middle of my page. I like the way they have used large letters at the beginning of each main paragraph. I will clearly the name of the artist as they have above. I am considering putting an additional picture, which the writing as it shows on the double page spread with Cheryl Cole on to make it seem more interesting and does not look overcrowded with writing. I will also add a quotation in bold writing like shown on the one with Cheryl Cole and Jay-Z.


However, I would add a clear boarder to make is not look like a poster and I may make the large letter a sort of grey so then it is easy to read the writing and you will still be able to see the letter.
 

Thursday, 14 February 2013

Comparing Contents Pages


After looking at my first draft, I realised I only had to make a few adjustments. I did this by adding a title to the top photograph to make it seem even. By adding in the title, it also covers up the empty space under the title. The last thing I did was that I moved the page numbers to the top right corner to make it seem neater. but then realised that i looked plain and boring so i looked back at my research and looked at how they placed page numbers. I then changed the titles of the sections and made them capital letters as well as the title of the pages. I then added a grey box to make it look more interesting.  I then changed the title of the page to make it more like my research which i think makes it look more professional. I am extremely happy with my contents page as I used my skills to the best of my ability. I feel it looks professional and like an actual music magazine. Also I feel it meets my target audience as it doesn’t look too childish and it involves thing that my target audience are interested in reading.

Final Edits for Contents Page

 
These are all of the problems I noticed about my magazine, I noticed that the top of the page was too empty and needed to be covered. I realised that the writing that says ‘THE POWER OF 5 BOYS!’ is the title of the arena picture and so I should do that for the picture above. I then noticed that the page numbers on the pictures were placed roughly.


To improve the number placement, I put the page numbers in the top right corner to make it look more organised.


 Then to fill in empty space at the top of the first photograph, I added a title like I did for the picture underneath.


After looking at what I thought was my finished contents page, I then noticed even more improvements that needed to be made.


I made the title of each section in capital letters to make it so the spacing in the red box was more even. I also noticed that on my research that they had full red boxes and capital letters and so I did the same. In addition, they added a grey box over one section of the writing and so I decided to do the same.


Looking back at my research, I realised that they had the title of each page in capitals so I decided to do the same. In addition, the spacing between the line and the numbers and the words had to be made bigger.


I then noticed that the numbers were not in line with the writing and so I had to change that to make it look more professional.


I then noticed that my title did not seem right and needed to be changed. I looked back at my research and noticed that the red banner went all across the page and so I did the same. However, I wanted to make the magazine my own so instead of having the ‘v’ inside the banner, I had it larger to make it look more artistic.


I then realised that the mage numbers did not look right and so I looked back to my research and saw that one of the contents pages had the numbers the way I have to make it artistic and fun to read instead of plain and simple.


I then thought that the titles of the pictures did not look right and so I made the spacing around it more even and removed the line underneath and it made it look over crowded.


FINAL CONTENTS PAGE